


Related news
RAW264.7 M1 Macrophage Polarization: A Practical 48-Hour Induction and Validation Guide
Table of Contents
RAW264.7 cells show up in a lot of macrophage work. Inflammation studies use them. So do immune response projects, tumor immunology experiments, and many basic macrophage assays. There is a simple reason for that. These cells are not difficult to grow, they expand fairly fast, and their response to inflammatory stimulation is usually easy to see.
The culture part is often straightforward. The M1 induction part needs more attention.
Adding an inducer does not automatically mean the model is ready. Cell condition matters. Seeding density matters too. Treatment time can change the result, and the same is true for the way the cells are checked after induction.
For labs that would rather not prepare every induction component from scratch, the RAW264.7 Macrophage M1 Polarization Induction Kit gives a fixed induction setup. The protocol uses a 48-hour treatment period. After that, the cells can go into ELISA, qPCR, flow cytometry, co-culture assays, phagocytosis studies, or other macrophage experiments.
Why Are RAW264.7 Cells Commonly Used for M1 Macrophage Polarization?
RAW264.7 is a mouse macrophage-like cell line. It is already familiar to many labs working on inflammation and macrophage function.
Primary macrophages have their place, but they also bring more variation and more preparation work. RAW264.7 cells are easier to expand and easier to use in repeated experiments. That is useful when several groups need to be run under the same basic conditions.
Stable Growth Makes Experimental Planning Easier
RAW264.7 cells normally grow without too much trouble when routine culture conditions are kept steady. A healthy log-phase culture can give enough cells for several treatment groups in a short time.
That does not mean cell condition can be ignored.
Cells that have been left too dense for too long may not respond the same way as a healthy culture. The same problem can happen with stressed cells or cultures that have not been handled consistently. If the starting cells are already in poor shape, the induction result can be messy no matter how good the later steps are.
For work that covers macrophage culture, inflammatory signaling, cytokine testing, and related cell assays, Solarbio also provides cell biology and immune research solutions. This is useful when the experiment needs more than one reagent category and the whole workflow has to be planned together.
M1 Polarization Produces Detectable Functional Changes
After suitable M1 induction, RAW264.7 cells do not stay exactly as they were in normal culture.
Their shape changes. Some surface markers change as well. The amount of inflammatory cytokine released into the culture medium can also rise.
These changes give several ways to check whether the model worked.
Looking through the microscope is the quickest one, but it should not be the only one. A cell can change shape because of density, stress, or handling. That is why flow cytometry and cytokine detection are useful in the same experiment.
How Can RAW264.7 Cells Be Induced Toward an M1 Phenotype?
A fixed induction procedure makes repeat experiments easier to manage. It also saves the time normally spent adjusting separate components one by one.
Start with Healthy Cells at the Right Density
Start with RAW264.7 cells in the logarithmic growth phase. A culture at around 80–90% confluence can be used for the induction setup.
Collect the cells, count them, and resuspend them in pre-warmed M1 polarization induction medium. A starting density of about 2 × 10^5 cells/mL can be used.
For a six-well plate, 2 mL per well is a practical volume. For a 12-well plate, 1 mL per well can be used.
The seeding density is worth checking carefully, especially when the model is being run for the first time. Cells that start too sparse may still be too sparse after 48 hours. Cells plated too heavily can become crowded before the induction is finished.
An untreated control helps here. It gives a direct reference for both cell density and morphology.
Keep the Induction Conditions Consistent for 48 Hours
The induction components in the kit are used at a final 1X concentration in the recommended RAW264.7 culture system.
After seeding, the cells are placed at 37°C with 5% CO2 and cultured for 48 hours.
It is a good idea to keep microscope images from both 24 hours and 48 hours. This is simple, but useful. If the final result looks unusual, those images can show when the cells started to change.
After 48 hours, the induction is complete. Cells can then be collected for flow cytometry, qPCR, or other cell-based tests. The supernatant can be kept for cytokine measurement.
For labs using cytokines as part of the final readout, this guide to cytokine detection with ELISA kits can help with sample handling and assay planning.
How Do You Confirm That RAW264.7 Cells Have Reached an M1-Like State?
There is no real advantage in depending on only one result.
If the morphology changes, CD86 rises, and pro-inflammatory cytokines also increase, the model is much easier to judge. If only one of those changes, it is worth checking the culture and induction conditions again.
Check Morphological Changes First
Untreated RAW264.7 cells are often fairly round under normal culture conditions.
After M1 induction, the cells can become more irregular. Polygonal and amoeboid-like cells may appear. Filopodia and lamellipodia may become easier to see, and the cytoplasm can look more granular.
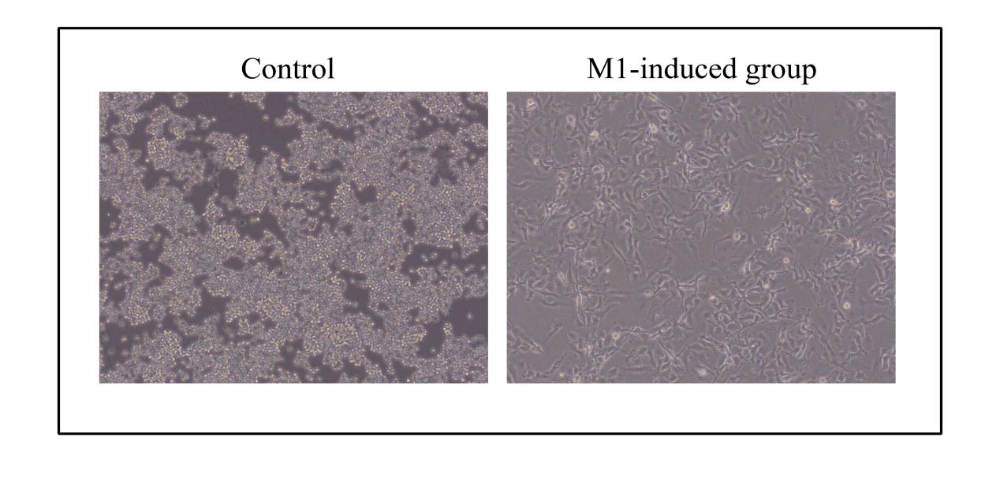
These changes are easy to record with routine microscopy.
Still, morphology is only a first check. A stressed cell can also look different. So can an overcrowded culture. Treat the image as one part of the result, not the whole result.
Use Flow Cytometry to Check the M1 Phenotype
Flow cytometry gives a more direct look at the cell phenotype.
One workable approach is to use F4/80 and CD11b to define the macrophage population and then check CD86 expression inside that population.
After a successful 48-hour induction, CD86 expression should increase compared with the untreated control.
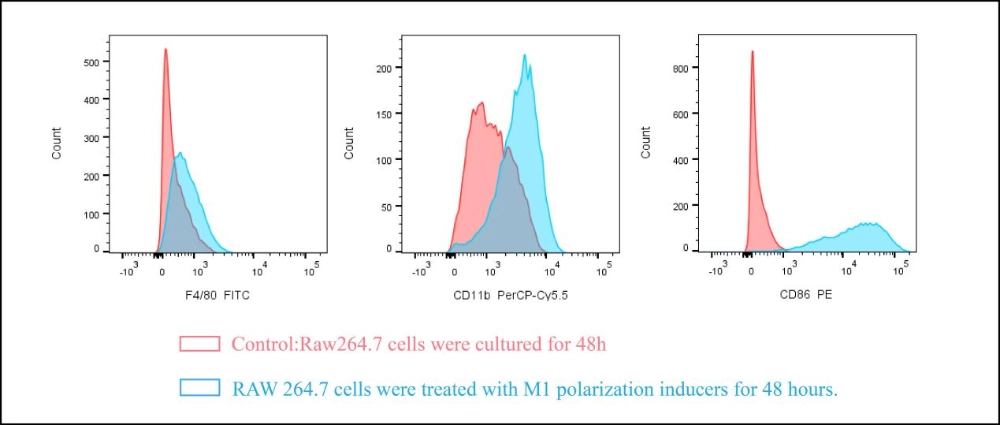
This helps separate a true polarization response from a simple change in cell shape.
Labs that are still working on routine cell culture quality may also find Cell Lines: The First Step Behind Reliable In Vitro Research useful. Cell identity and basic culture condition can affect everything that comes after them.
Measure Pro-Inflammatory Cytokine Release
Cytokine secretion gives another piece of the picture.
IL-1β, IL-6, and TNF-α are commonly checked in RAW264.7 M1 experiments. After induction, the culture supernatant can be collected and tested with mouse ELISA kits.
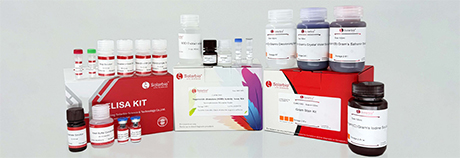
Solarbio provides SEKM-0002 Mouse IL-1β ELISA Kit, SEKM-0007 Mouse IL-6 ELISA Kit, and SEKM-0034 Mouse TNF-α ELISA Kit through the Solarbio ELISA Kit product line.
If the M1 model has been induced properly, these inflammatory cytokines should show an upward change compared with the untreated group.
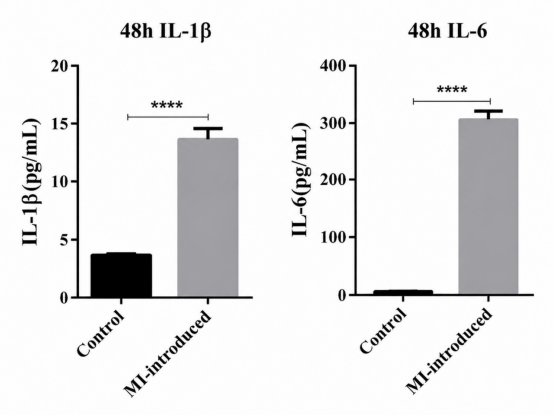
The exact level can vary with cell condition and experimental setup. For that reason, the control group should be prepared and collected in the same way as the induction group.
What Products Can Be Combined for a Complete RAW264.7 M1 Workflow?
The induction reagent is only one part of the job.
A RAW264.7 M1 experiment starts with the cells themselves, then goes through routine culture, induction, and finally phenotype confirmation. If these stages are treated as separate jobs, troubleshooting becomes harder.
Cell Culture and M1 Induction
SCC211800 RAW264.7 cells can be used together with C211800 RAW264.7 cell-specific culture medium.
CA4980 RAW264.7 Macrophage M1 Polarization Induction Kit covers the induction step. CA4981 RAW264.7 Macrophage M1 Polarization Inducer is available when the induction reagent is needed separately.
Using a fixed cell culture and induction setup also makes repeat experiments easier to compare. When too many basic materials change between batches, it becomes difficult to know whether a different result comes from biology or simply from the experimental setup.
ELISA and Flow Cytometry Validation
For cytokine testing, SEKM-0002, SEKM-0007, and SEKM-0034 cover mouse IL-1β, IL-6, and TNF-α.
For flow cytometry, SFCMZ-008 RAW 264.7 Cell M1 Macrophage Polarization Induction and Identification Flow Cytometry Kit can be added when phenotype identification is part of the study.
Researchers working on the signaling side of the model can also browse Solarbio Pathways to look for related pathway targets, compounds, and research tools.
Keeping these steps connected makes troubleshooting a little less painful. If the morphology looks normal but the cytokine result does not, the problem can be checked from the validation side. If the cells already look poor before induction, there is little reason to blame the ELISA result later.
What Should You Watch Before Running the Experiment?
A kit can make the induction procedure easier. It cannot fix unhealthy cells.
Check the RAW264.7 culture before starting. If the cells are already crowded, stressed, or growing unevenly, it is usually better to start again with a healthier culture.
Keep an untreated control. Use the same seeding density from batch to batch. Take microscope images at fixed times rather than only when something looks unusual.
For cytokine work, collect the supernatant at the same time point for every group. Small timing differences can add extra variation.
Flow cytometry also needs a fixed gating approach. Changing the gate after looking at the result can make two groups look more different than they really are.
It helps to decide on the readouts before the induction begins. If CD86, IL-1β, IL-6, and TNF-α are already part of the plan, cell and supernatant collection can be arranged properly from the start.
For projects that need more support around product selection, antibodies, proteins, or other research services, Solarbio technical services can be used with the standard product workflow.
Conclusion
RAW264.7 cells are a practical choice for M1 macrophage polarization work. They grow easily, respond to inflammatory stimulation, and can be checked with methods already used in most cell biology labs.
The 48-hour induction process itself is not complicated. The details around it are what usually decide whether the result is clean.
Start with healthy cells. Keep the density steady. Run an untreated control. Save the 24-hour and 48-hour images.
Then check more than one endpoint.
Morphology gives the first clue. F4/80, CD11b, and CD86 give a flow cytometry readout. IL-1β, IL-6, and TNF-α add cytokine data.
When those results point in the same direction, the RAW264.7 M1 model is much easier to use in later inflammation, immune response, and macrophage function experiments.
For help matching culture products, induction reagents, ELISA kits, or flow cytometry tools to a planned experiment, researchers can contact Solarbio before putting the full workflow together.
FAQ
Q1: How long does RAW264.7 M1 macrophage polarization take?
A1: The CA4980 workflow uses a 48-hour induction period. It is useful to keep microscope images at 24 and 48 hours so the cell changes can be compared during the treatment.
Q2: What cell density can be used before M1 induction?
A2: About 2 × 10^5 cells/mL can be used as a working starting density after healthy log-phase RAW264.7 cells are collected and counted. The final density should still be checked against the plate format and the growth condition of the cells.
Q3: Can cell morphology alone confirm M1 polarization?
A3: No. Morphology is useful for a quick check, but it is not enough by itself. Flow cytometry markers and inflammatory cytokine measurements give better support for the final result.
Q4: Which flow cytometry markers can be used for RAW264.7 M1 polarization?
A4: F4/80 and CD11b can be used to identify the macrophage population. CD86 can then be checked as an M1-associated marker. A rise in CD86 after induction supports the M1 polarization result.
Q5: Which cytokines can be measured after RAW264.7 M1 induction?
A5: IL-1β, IL-6, and TNF-α are common choices. The culture supernatant collected after induction can be tested with mouse ELISA kits.
Q6: What downstream experiments can be performed after M1 induction?
A6: The induced RAW264.7 cells can be used for ELISA, qPCR, flow cytometry, co-culture studies, phagocytosis assays, and other experiments related to macrophage inflammation and immune function.
 Consult
 Whatsapp
 Leave Message
 top
top